Carrot juice cavatelli, tops salsa and spiced pulp crumble by Jeremy Fox

102 Carrot Juice Cavatelli

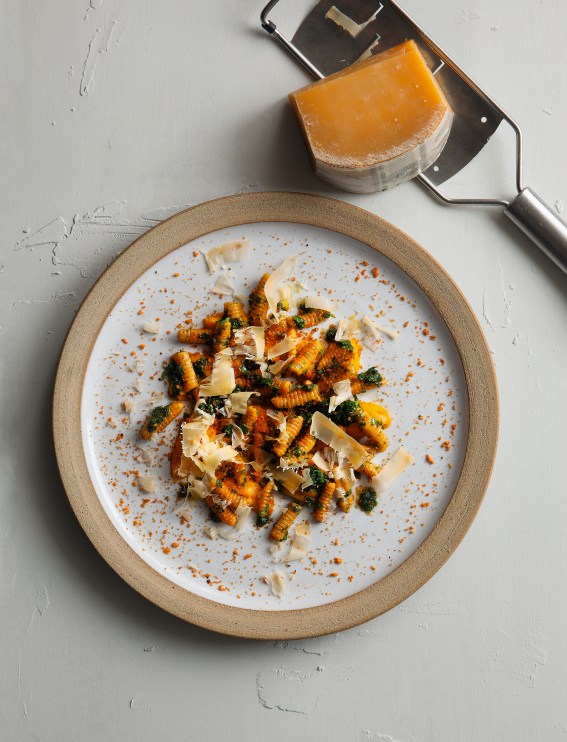
This dish accomplishes two things: First, it’s the purest example of using every single part of a vegetable in one single dish. And second—and what I was really trying to accomplish—the cavatelli look like that bright orange Kraft macaroni and cheese from a box. If you are making this dish from the ground up, it is pretty exciting, as you can use the tops of your carrots to make the salsa, the juice to make the cavatelli, and the pulp (from juicing) to make the crumble. Note Start cooking the day before you intend to serve this. The carrot pulp and cavatelli dough will need overnight to dehydrate and rest, respectively.

serves 4
carrot juice cavatelli
41/4 cups (530 g) “00” flour, plus more for dusting
1 teaspoon kosher salt, plus more for the cooking water
1 cup (240 ml) fresh carrot juice (from orange carrots), pulp reserved to serve
3/4 cup (180 ml) Carrot Purée (see below)
4 tablespoons Salsa Verde using the leaves of young carrot tops (see below)
4 tablespoons Carrot Crumble (see below)
aged gouda cheese

Make the carrot juice cavatelli:
In a food processor, blend together the flour and salt. With the machine running, slowly add the carrot juice (you may not need all of it), until the dough comes together. Be careful not to overwork the dough in the food processor: The dough may well look crumbly, but if you press it together with your fingers it should very easily combine into dough. You are looking for a texture similar to Play-Doh: elastic, pliable, and not sticking to your fingers when you touch it. If the dough is too dry, add more juice; too wet, add more flour.

Transfer the dough to a lightly floured surface and knead it with the heels of your hands for about 1 minute, until you have a smooth dough.

Wrap the dough tightly with plastic wrap (clingfilm) and let it rest overnight in the refrigerator.

Place the carrot pulp on a dehydrator tray and dehydrate at 135°F (57°C) overnight.

About 1 hour before you plan to make the cavatelli, let the dough come to room temperature—this will make it much easier to work with. Divide the dough into 6 pieces. Lightly flour a work surface. Working with one piece at a time—and keeping the rest of the dough covered—roll the dough into a long, thin rope, about 1/8 inch (3 mm) in diameter. Cut the rope crosswise into 1/4-inch (6 mm) pieces.

Using a cavatelli board, or the tines of a fork, gently but confidently roll the dough pieces against it. The cavatelli may not come out perfect right away, but soon the motion will find its way into your muscle memory.

Once the cavatelli are shaped, lay them in a single layer (not touching) on a baking sheet lined with a tea towel. Repeat this process until all of the dough has been turned into cavatelli. These are best cooked when fresh, so if you are going to be cooking them the same day, you can just leave them out. Otherwise, cover and refrigerate for up to 2 days.

Bring a large pot of water to a boil. Season your water with salt so it tastes like the sea. I think it’s important to taste the pasta water to make sure it is seasoned properly. Once seasoned and boiling, add the cavatelli and cook until they float to the surface, about 3 minutes. If you’re not sure whether they are done, the best test is just to eat one.

To serve
While the pasta water heats up, gently warm the carrot purée in a small pan over low heat and keep covered (and warm) until serving.

Using a sieve, scoop the cavatelli out of the pasta water and into a wide bowl. Immediately dress them with the carrot top salsa verde and toss to combine. Ladle in some of the starchy, seasoned pasta water, a little at a time, to open up the flavors and create a very light sauce that will coat the cavatelli. Don’t add too much water or it will make for a thin, diluted sauce.

Place dollops of the carrot purée on 4 warmed plates. Spoon the cavatelli on top and sprinkle the carrot crumble over the pasta and the plate. I like being able to drag the cavatelli through more of the crumble as I’m eating it. Shave ribbons of Gouda over the top and serve immediately.

Carrot Purée
When raw ingredients are salted, it helps extract the water from them. By breaking down the carrots first, it increases the surface area and expedites the process even more. As a result, it’s possible to make a carrot purée with no extra water added, highlighting the pure flavor of carrot and nothing else. Serve as a side dish, or as a component of a larger dish, such as the Carrot Juice Cavatelli, Tops Salsa & Spiced Pulp Crumble.

Peel the carrots (the peels can be reserved for Vegetable Stock, page 312) and then cut the carrots into rough 1-inch (2.5 cm) cubes. These do not have to be perfect, as they will all eventually be puréed.

In a bowl, toss the carrots with 2 tablespoons of the grapeseed oil and the salt and set aside for about 10 minutes. Transfer the carrots to a food processor and blend until broken up.

Transfer the mixture to a saucepot or large sauté pan. Set the pan over medium-low heat, cover, and cook, undisturbed, for 40 to 45 minutes. You’ll know it’s ready when you can smear it with a spoon. (If you take it off the heat too early, you will find the texture of the purée to be somewhat grainy after you purée it.) Transfer the mixture to a blender and blend on low speed, then gradually increase to high speed while slowly drizzling in the remaining 4 tablespoons grapeseed oil. Blend the purée to the consistency of mayonnaise. Season to taste with salt; it should have a pure carrot flavor. Store in an airtight container refrigerated for up to 3 days.

Carrot crumble
Another dehydrated pulp (like beet soil), carrot crumble can basically function as a carrot-based breadcrumb. It is especially delicious sprinkled over dishes like the Carrot Juice Cavatelli, Tops Salsa & Spiced Pulp Crumble (page 103), but also works well sprinkled over any carrot preparation.

makes about 3/4 cup (100 g)
2 cups (480 g) carrot pulp (from 3 pounds/1.3 kg orange carrots that have been juiced)
2 teaspoons granulated sugar
11/2 teaspoons Fox Spice (page 263)
1 teaspoon kosher salt
2 tablespoons extra-virgin olive oil

Spread the pulp evenly on a dehydrator tray and dehydrate at 125°F to 135°F (52° to 57°C) for at least 8 hours, or until completely dry. You should get about 3/4 cup (53 g) of dehydrated pulp.

Transfer the pulp to a mortar and pestle and grind until you have the rustic texture of a fine breadcrumb. (A food processor will turn your breadcrumbs into more of a uniform powder.) Transfer to a bowl and add the sugar, spice, and salt and stir together.Store in an airtight container indefinitely at room temperature. Stir in the olive oil until combined.

Salsa verde
I like this salsa on everything—be it fish, a grilled piece of meat, or roasted vegetables. Thanks to the brine, this salsa is similar to chimichurri, and like with Pesto (page 270), you can swap the carrot tops for whatever herbaceous greens you have on hand: celery leaves, parsley leaves and stems, and so on. Additionally, this is a great way to use pickle brine, but if you don’t have any, feel free to use the juice of the lemons you’ve zested.

makes 3/4 cup (180 ml)
1/2 cup (25 grams) chopped carrot tops
1/2 cup (120 ml) extra-virgin olive oil
2 garlic cloves, germ removed, finely chopped
2 tablespoons pickled vegetable brine or lemon juice
finely grated zest of 2 lemons

In a bowl, combine the carrot tops, olive oil, garlic, pickle brine (withhold this ingredient if not using the salsa right away), and lemon zest and whisk thoroughly until combined. Use immediately or cover and refrigerate for up to 3 days. If storing to use later, don’t add the brine (or lemon juice) until right before serving. The sauce may separate a bit, so just give it a quick whisk again before using.

Cook more from this book
Lima bean and sorrel cacio e pepe
Carta da musica, leaves, things and truffled pecorino

Read the review

Buy this book
On Vegetables: Modern Recipes for the Home Kitchen

£29.95, Phaidon 


Lima bean and sorrel cacio e pepe by Jeremy Fox

070 Lima Bean and Sorrel Cacio e PepeLima beans, also known as butter beans, are probably my favorite shell bean. Fun fact: When I put this dish on the menu at Rustic Canyon with the name “lima bean,” nobody buys it, but when I list it as “butter bean,” it sells out and everybody loves it.

To me, one of the best things about eating beans is the broth, and when you can add butter, garlic, and pecorino to it, it becomes something really great. The only acidity in this dish comes from the sorrel, which brings a really nice tang.

serves 4
1 pound (455 g) shelled fresh lima (butter) beans
2 garlic cloves, germ removed, peeled and smashed
2 teaspoons fresh rosemary leaves
1/2 cup (2 oz/60 g) tightly packed torn sorrel leaves, plus 2 tablespoons fine chiffonade of sorrel leaves
1 tablespoon freshly ground black pepper kosher salt
2 tablespoons (30 g) unsalted butter, at room temperature
4 teaspoons Garlic Confit Purée, at room temperature (see below)
1/2 cup (30 g) finely grated pecorino romano cheese
2 tablespoons oil from Garlic Confit, at room temperature
1 tablespoon grated Cured Egg Yolk (see below)

Place the lima beans in a pot filled with 4 cups (1 liter) cold water. Place the garlic and rosemary in a single-layer square of cheesecloth, tie it into a sachet, and add it to the pot with the beans. Bring to a simmer over medium heat, then reduce the heat to low and cook, uncovered, at just below a simmer, until the beans are tender, 30 to 40 minutes.

Remove the pot from the heat, discard the sachet, and add the torn sorrel, black pepper, and salt to taste. (You will notice that the sorrel turns drab quickly, but that’s okay. It’s about the flavor more than the appearance, with tart sorrel standing in place of lemon to balance out the other ingredients.)

Right before serving, fold the butter into the beans.

To serve, warm the bowls and add 1 teaspoon of the garlic confit pureé to the bottom of each bowl. Spoon the beans and their broth into the bowls (since black pepper tends to settle to the bottom of the pot, make sure to re-stir the soup before each ladle).

Finish with the chiffonade of sorrel, grated pecorino, garlic confit oil, and cured egg yolk.

Garlic confit

Confiting is the process of slowly cooking something while it is submerged in fat. Duck confit is probably the most famous version of this method, and it is cooked in duck fat. Garlic confit is not cooked in garlic fat, because to my knowledge, garlic fat does not exist.

Confited ingredients are incredibly useful to keep in your larder. They add deep, slowly developed flavors to any dish, even if you don’t have the time to slow-cook something.
At Ubuntu, we’d often wind up with too many greens, so we would blanch and purée them with some of the confited garlic and its oil. The purée would look bright, fresh, and green, while also tasting of deep, slow cooking.

makes 2 cups (480 ml)
1 pound (455 g) whole garlic cloves, peeled
4 sprigs thyme
1 teaspoon kosher salt
1 cup (240 ml) extra-virgin olive oil
1 cup (240 ml) grapeseed oil

Preheat the oven to 250°F (120°C/Gas 1/2).

Place the garlic cloves in a pot or a baking dish with a lid. Add the thyme and salt and
pour over the olive and grapeseed oils. Cover and transfer to the oven. Bake until the
cloves are spreadable but not falling apart, 2 to 3 hours.

Let the garlic cool to room temperature. Store airtight in the refrigerator for up to 1 month.

Garlic confit purée

Here is yet another of the many great things you can do with garlic confit. This pureé has a garlicky, roasted flavor that functions as an excellent condiment for all sorts of things, like tomato salad or roast chicken.

makes 1 1/2 cups (360 ml)
1 cup (240 ml) Garlic Confit
11/2 tablespoons apple cider vinegar
1/2 teaspoon kosher salt

In a blender, combine the garlic confit, vinegar, 1/2 cup (120 ml) water, and the salt and purée until smooth. Store in an airtight container in the refrigerator for up to 1 week.

Cured egg yolk

This cured egg yolk functions as a great vegetarian replacement for the salty, briny taste of bottarga (cured fish roe). It is excellent grated over things like pasta, Caesar salad, or steak tartare. Try to find the freshest eggs from your local farmers market—with rich, orange yolks—and give the yolks six full days to cure.

makes 12 yolks
1 pound (455 g) kosher salt
1 pound (455 g) granulated sugar
12 large egg yolks

Combine the salt and sugar in a large bowl. Transfer three-fifths of the cure to an 18 x 13-inch (46 x 33 cm) rimmed baking sheet.

Using the pointy end of a whole egg, dig 12 evenly spaced divots in the cure, being careful not to burrow so deeply that you are exposing the bottom of the pan (you are going to be filling the divots with egg yolks and the yolks need to be entirely surrounded by the cure).

Place each yolk in its own divot. Using the remaining cure, cover each yolk so they are completely encased.

Cover the sheet with plastic wrap (clingfilm) and refrigerate for 2 days.

Remove the plastic wrap, flip the egg yolks over, and then cover again with the cure.
By this point, the yolks should be quite sturdy and shouldn’t break easily, making the flipping quite easy. Cover again with plastic wrap and refrigerate for 2 more days.

After curing the egg yolks for 4 days (total), remove the yolks from the cure and rinse them under a gentle stream of room-temperature running water. At this point, there is still an outer membrane, which you may not be able to see—but I swear it’s there. While running the yolks under water, carefully remove and discard that membrane, then set the yolks aside on paper towels.

Pat dry the yolks thoroughly (don’t worry about handling them, as they should be sturdy, and even if they become misshapen, you can usually reshape them into their original form).

Lay the egg yolks on a dehydrator tray (not on a pan or dehydrator sheet as you want as much air circulation as possible) and dehydrate at 135°F (57°C) for 2 days until fully dried. Wrap each yolk individually in paper towels and refrigerate for up to 1 month. (They may well last longer than a month, but they’re so damn tasty that I’ve never waited long enough to find out.)

Cook more from this book
Carta da musica, leaves, things and truffled pecorino
Carrot juice cavatelli, tops salsa and spiced pulp crumble

Read the review

Buy this book
On Vegetables: Modern Recipes for the Home Kitchen

£29.95, Phaidon


On Vegetables by Jeremy Fox

On Vegetables by Jeremy Fox

What’s the USP? As the title suggests, it’s a book all about how to cook vegetables written by a leading American chef.

Jeremy who?  UK readers may not be familiar with the name, but American chef Jeremy Fox made quite a splash in the States back in 2007 with Ubuntu restaurant in Napa, California.  The San Francisco Chronicle said the restaurant was ‘truly extraordinary.’ and that Fox was ‘taking vegetable-based cuisine to a new level’. Food and Wine magazine named him ‘Best New Chef’, the New York Times called the restaurant the second best in America and Michelin awarded a star.  Fox is currently head chef and part owner of Rustic Canyon in Santa Monica where he continues to champion vegetables, (as well as serving up carnivorous delights like bone-in pork chop, babaganoush, beylik roasted tomato, fennel and olives).

What does it look like? Fox’s food somehow manages to be both elegant and minimal and homely and comforting at the same time. The pared-back food styling features beautiful crockery often shot against plain white backgrounds, letting the dishes speak for themselves, and what they say loud and clear is ‘Eat Me’.

Is it good bedtime reading? Fox tells his personal story – an award-winning chef wracked with anxiety and depression – with unbridled candour. There are engaging profiles of some of his favourite producers and he writes with great wit and insight about some of the key ingredients in his cooking, (no mean feat, believe me). On asparagus, he says, ‘getting it shipped in from the opposite hemisphere means it’s going to taste of jet fumes. You ever notice how funky your clothes smell after you get off a plane? Well imagine what air travel does to a porous plant that’s going to wind up inside your mouth’. The recipe introductions are peppered with little jokes, mostly of the Dad variety, making the book a fun read.

Will I have trouble finding ingredients? If you live in California, no. Just pop down to your local farmer’s market and pick up some of that abundant, beautiful, fragrant and ripe produce. In the UK, if you pop down to your local farmer’s market you’re more likely to find cling wrapped meat and bad versions of street food. Although there’s nothing particularly obscure in the book, the recipes really are a celebration of the finest, freshest produce, something you simply won’t find at the supermarket. Befriending someone with an allotment would be your best bet.

What’s the faff factor? The food appears simple enough on the plate, the ingredients lists look short enough but start reading the recipes and you realise that often there are a number of other recipes elsewhere in the book that go to make up the completed dish. But this is food from the former head chef of three Michelin-starred Manresa restaurant, so what did you expect?

How often will I cook from the book? If you’re willing to put the time in to build up larder ingredients like homemade ricotta, confit garlic and mushroom conserva and you can get your hands on some decent veg, then the food is so attractive and delicious sounding that you might just fall down a gastronomic rabbit hole with this book.

Killer recipes? There are many, but a random few include country fried morels with green garlic gravy; fennel confit, kumquat, feta, chilli and oregano;  pane frattau with fennel, strawberry sofrito, carta da musica and egg, and carrot juice cavaelli, tops salsa and spiced pulp crumble.

What will I love? The gorgeous images, the no-nonsense writing style, Fox’s original approach to cooking with vegetables and the endless inventiveness of the recipes.

What won’t I like? As Fox says himself, ‘If you’re looking for “10 Easy Weeknight Dinners for Vegetarians”, this book will not be of much use to you’.

Should I buy it? Its funny, moving, original and it will change the way you think about vegetables forever. Of course you should bloody well buy it.

Cuisine: Vegetarian
Suitable for: Professional chefs/Confident home cooks
Cookbook Review Rating: 5 Stars

Buy this book
On Vegetables: Modern Recipes for the Home Kitchen

£29.95, Phaidon

Cook from this book
Lima bean & sorrel cacio e pepe
Carta da musica, leaves, things and truffled pecorino
Carrot juice cavatelli, tops salsa and spiced pulp crumble

Pineapple tart Tatin by Jack Stein

Pineapple Tart Tatin - 1032

A tarte Tatin is always a wonderful thing. It is one of those desserts that just works in any situation. Flexible and adaptable, tarte Tatin can be made with very many different fruits. I love cooked pineapple and I think it works beautifully here.

SERVES 6

250g puff pastry
75g butter, softened
175g caster sugar
1 medium-sized pineapple
to serve
vanilla ice cream, coconut sorbet or crème fraîche

Roll out the pastry on a lightly floured surface and cut out a 26cm disc, slightly larger than the top of a 20cm tarte tatin dish or reliably non-stick cast-iron frying pan. Transfer to a baking sheet and chill for at least 20 minutes.
Meanwhile, spread the butter over the base of the tarte tatin dish or frying pan, and sprinkle over the sugar in a thick, even layer.

Cut the top and bottom off the pineapple, trim the skin off the side and slice into rounds, each about 5cm thick.

Tightly pack the pineapple slices into the tarte tatin dish or frying pan and place over a medium heat. Cook for 20–25 minutes, gently shaking the pan now and then, until the butter and sugar have mixed with the pineapple juices to produce a rich sauce and the pineapple is just tender. At first the caramel will be pale and there might be some liquid from the juices of the pineapple, but as you keep on cooking, the juices will evaporate and the butter and sugar will become darker and thicker. Just take care that the butter and sugar do not burn. When the pineapple has been caramelised, remove the pan from the heat.

Pre-heat the oven to 170°C Fan (190°C/Gas Mark 5).

Gently place the pastry on top of the pineapple slices and tuck the edges down inside the pan. Prick the pastry 5 or 6 times with the tip of a small, sharp knife, transfer to the oven and bake for 25 minutes, until the pastry is puffed up, crisp and golden.

Remove the tart from the oven and leave it to rest for 5 minutes. Run a knife round the edge of the tart and invert it onto a round, flat serving plate. Serve warm, cut into wedges, with crème fraîche or vanilla ice cream.

Cook more from this book
Green pasta bits
Cornish chilli crab

Read the review

Buy this book
Jack Stein’s World on a Plate: Local produce, world flavours, exciting food
£26, Absolute Press

Extract taken from Jack Stein’s World on a Plate by Jack Stein (Absolute Press, £26)
Photography © Paul Winch-Furness

Green pasta bits by Jack Stein

Green Bits Pasta - 0781

This is a dish from my girlfriend, Lucy, who is from a Sicilian family. Lucy usually makes this on a Monday, when we have a ton of green vegetables left over from the Sunday roast. You can use virtually any green vegetable. Be sure to leave the Parmesan rind in the pasta to give it a lovely depth of flavour. If I have been busy at work and really want something comforting and healthy to eat, this is it.

Once when I was working at The Seafood Restaurant, an Italian woman was invited into the kitchen. While I was showing her around, she told me that the best way to cook pasta was her way. So here it is. Cook the pasta as usual, then, when it’s ready, drain it through a colander, being careful to collect the water in a pan. Add butter to the hot pasta, stir it through and pour the water back through the pasta again. This is the way I have cooked pasta ever since!

SERVES 4

3 tablespoons olive oil plus more if needed
1 onion, finely chopped
½ teaspoon chilli flakes
2 garlic cloves, finely chopped
100g grated Parmesan cheese and Parmesan rind
500g dried rigatoni or penne
400g mixed green vegetables, such as fresh tenderstem broccoli, asparagus and spinach, and frozen peas (used here)
1 tablespoon butter plus an extra knob for the pasta
juice of ½ lemon
salt and pepper

Fill a pan of water for the pasta. Salt generously and bring to the boil.

Heat the olive oil in a large pan over a medium heat, add the onion and chilli flakes and a pinch of salt, and cook slowly until soft but not coloured (about 5–10 minutes). Add the garlic and the Parmesan rind. Leave on the lowest possible heat while you prepare the rest of the dish.

Meanwhile add the pasta to the boiling water and cook until al dente, about 1 minute less than the packet instructions suggest.

Prepare the vegetables. Slice the broccoli stems and asparagus spears into 2cm pieces, keeping the heads intact. Add them to the pan containing the onion mixture, and turn up the heat, stirring so that they are covered with oil. Add 1 tablespoon butter and a pinch of salt. Cook for 5 minutes until they are softened but still have a bite.

Wash the frozen peas under warm water to defrost them; drain off the water and add the peas to the broccoli and asparagus and cook for 1 minute. Cut the spinach into strips and add to the pan; let it wilt down and add another pinch of salt. There should be enough oil to coat all the vegetables; if necessary, add a little more.

When the pasta is ready, drain it into a colander set over a large pan. Put the pasta back into the pan and stir through a knob of butter. Pour the collected water back into the pan to coat the pasta and drain over the large pan again.

Remove the Parmesan rind. Pour in the vegetable sauce and stir to make sure it is all combined. Add the lemon juice and a handful of Parmesan and stir these through, along with a final tablespoon or two of the pasta cooking water.

Plate up the pasta and vegetables and top with more Parmesan, black pepper and a drizzle of olive oil.

Cook more from this book
Cornish chilli crab
Pineapple tart tatin

Read the review

Buy this book
Jack Stein’s World on a Plate: Local produce, world flavours, exciting food
£26, Absolute Press

Extract taken from Jack Stein’s World on a Plate by Jack Stein (Absolute Press, £26)
Photography © Paul Winch-Furness

Cornish chilli crab by Jack Stein

Chili Crab - 0228

Singapore, in many ways, is where it all really began for me. Our family had travelled in Europe and eaten oysters and other fruits de mer in Brittany and beyond but in 1985, on a trip to Australia when I was five, my love of seafood really took off. On a stopover in Singapore we went, as usual, to a night market and that’s where I first saw and tasted chilli crab. Maybe it was the jet lag, maybe the unbelievable humidity, but something in the experience opened my senses. I knew crabs, but not like these. Those watching me in the market might have been confused to see a small, pale, ginger-haired kid looking perplexed by his sensory overload, but in fact I was being seduced by the wonderful flavours that the crab dish had to offer. Ever since I have found the combination of eating Asian food at 11pm while jet-lagged to be paradise – and I owe it all to this dish!

My father’s version of chilli crab uses brown crab, which is far fuller-flavoured than the mud crabs used in Singapore. My own recipe is similar to his but with a few tweaks – a classic but with just a little twist.

SERVES 4

2kg boiled brown crab
4 tablespoons groundnut or sunflower oil
4 garlic cloves, finely chopped
2.5cm fresh root ginger, finely chopped
3 medium-hot, red, Dutch chillies, finely chopped
4 tablespoons tomato ketchup
2 tablespoons dark soy sauce
1 teaspoon Marmite
2 spring onions, cut into 5cm pieces and finely shredded lengthways
a handful of chopped coriander

Put the crab on its back on the chopping board, so that the claws and softer body section face upwards, then simply twist off the main claws, leaving the legs attached to the body. Now put your thumbs against the hard shell, close to the crab’s tail, and push and prise the body section out and away from the shell. The legs should still be attached to the body. Remove the small stomach sac situated just behind the crab’s mouth and pull away the feather-like gills (‘dead man’s fingers’) which are attached along the edges of the centre part; discard these.

Using a teaspoon, scoop out the brown meat from inside the shell; reserve.

Chop the body into quarters and then cut the main claws in half at the joint. Crack the shells of each piece with a hammer or the blunt edge of a large knife.

Heat the oil, garlic, ginger and chilli in a wok for 1 minute to release their aromas.

Next, turn up the heat and fry off the brown crab meat, then add the ketchup, soy sauce, Marmite and 150ml water. These all add savoury and sweet notes to the finished dish. Now add the remaining crab in its shell and stir-fry the crab for 2 minutes. Remove from the heat and finish with spring onions and chopped coriander.

Serve immediately – with lots of finger bowls and napkins, as this is a messy dish.

Cook more from this book
Green pasta bits
Pineapple tart tatin

Read the review

Buy this book
Jack Stein’s World on a Plate: Local produce, world flavours, exciting food
£26, Absolute Press

Extract taken from Jack Stein’s World on a Plate by Jack Stein (Absolute Press, £26)
Photography © Paul Winch-Furness

Jack Stein’s World on a Plate

Jack Stein

What’s the USP? A chef’s global travels recorded in recipes.

Who’s the author? If you think you recognize the surname, you’re right. Jack is the son of Rick and since 2017, Chef Director of the Stein restaurant empire, which under his direction has grown from its HQ in Padstow across Cornwall and the south of England. His CV also includes stints at notable restaurants around the globe including La Régalade in Paris and Testsuya in Sydney. World on a Plate is his first cookbook.

What does it look like? The fresh, colourful and appetising dishes (shot by top food photographer Paul Winch-Furness) are interspersed with shots of yer man walking his dog, with his surfboard and chatting to fishermen (any of this sounding familiar, fellow Rick Stein fans?). 

Is it good bedtime reading? The skimpy intro won’t keep you occupied for long but there’s plenty of anecdotes about Stein’s travels and useful cooking tips embedded into the individual recipe introductions.

Will I have trouble finding ingredients? You’ll find the vast majority in the supermarket, but you’ll want to do the Stein name justice by visiting your local fishmonger for some decent fish for langoustine with pastis and sea trout with samphire and beurre blanc.

What’s the faff factor? There’s a nice cross-section of dishes to rustle up when time is tight like crab omelette and more complicated, involved recipes such as guinea fowl terrine.

How often will I cook from the book? With everything from a fish finger sandwich to a Sunday lunch (‘My roast topside of beef), Jack Stein’s World on a Plate won’t be collecting dust on your bookshelf.

Killer recipes? Maple roasted pumpkin with rocket, dukkah and feta; Carl Clarke’s chicken clusters in laksa sauce; lamb shoulder with white miso cream and chicory; babi gulang (Balinese spicy pork with green bean and peanut salad); turbot on the bone roasted with bone marrow sauce.

What will I love? This is truly global cooking with recipes inspired by France, America, China, Australia, Thailand and of course Cornwall, which brings huge variety to the book.

What won’t I like? Stein wanton larder raiding of so many cuisines means you might bankrupt yourself buying all the different ingredients required to prepare the recipes. 

Should I buy it? If you’re looking for inspiration for something a bit different for a mid-week meal to cook at home, this hits the spot. Although you might notice some crossover between father and son’s cookbooks (Jack did a lot of his global travels on family research trips for The Seafood restaurant) Stein Jr has an individual enough voice to make the recipes his own.

Cuisine: Modern British
Suitable for: Confident home cooks
Cookbook Review Rating: 4 stars

Buy this book
Jack Stein’s World on a Plate: Local produce, world flavours, exciting food
£26, Absolute Press

Cook from this book
Cornish Chilli Crab
Green pasta bits
Pineapple tart tatin

Roots by Tommy Banks

roots tommy banks

What’s the USP?  Fans of Kunta Kinte will be disappointed to learn that this is not another  update of Alex Haley’s famous slave saga. The title actually refers to the ‘root ingredients’ used fresh or preserved by acclaimed young chef Tommy Banks, who divides the year into three rather four seasons which he calls The Hunger Gap (January to May); Time of Abundance (June to September) and the Preserving Season (October to December) which reflects the way he cooks at his North Yorkshire restaurant The Black Swan at Oldstead.

Who’s the author? Tommy Banks has had something of a meteoric rise since taking over the kitchens of the family restaurant in 2013, aged just 24. He’s one of the youngest ever Michelin starred chefs in the UK and has become something of a TV personality, appearing on the Great British Menu where he cooked turbot with strawberries and cream (recipe included in the book) at the grand banquet at Wimbledon and was a featured chef on Masterchef the Professionals where he demonstrated his signature dishes including crapudine beetroot cooked slowly in beef fat with smoked cod’s roe and linseeds, also included in this, his debut book.

What does it look like? Bucolic. The North Yorkshire landscape looks stunning and there are plenty of shots of Banks posing in fields and on the family farm gathering his beloved ingredients. The food is colourful and attractive without being too tortured on the plate.

Is it good bedtime reading? The short autobiographical introduction is bolstered by chapter introductions and essays on favoured ingredients such as elderflower, summer berries and ‘hedgerow harvests’ making Roots more than simply a collection of recipes.

Will I have trouble finding ingredients? If you’re not a keen gardener then you might find it tricky to lay your hands on things like crapudine beetroot and courgette stalks, and you’ll need to follow Banks’s recipes for fermenting vegetables to make a number of dishes, plus you’ll need a good fishmonger if you’re planning on serving raw red mullet, and a decent butcher who can sell you sweetbreads and mince pork back fat for you, and you’ll need to get out picking elderflowers in June if you want to make elderflower drizzle cake, and…

What’s the faff factor? This is fundamentally a collection of restaurant dishes so expect to put in a fair amount of effort for your dinner.

How often will I cook from the book? This is more weekend project than mid-week supper cooking.

Killer recipes? See above, but also crab, elderflower and potato salad; scallops cured in rhubarb juice with Jerusalem artichoke, and potato skin and brassica broth with cheddar dumplings.

What will I love? All the recipes are rated either 1,2 or 3 for complexity which makes choosing what you want to cook from the book, depending on the time you have to hand easy. But this is more than just a collection of delicious sounding, interesting and characterful recipes, a real effort has been made to give a sense of Banks’s cooking ethos and life at The Black Swan.

What won’t I like? Some readers may feel they’ve been-there-and-done-that with the pickling, fermenting and foraging aspect of the book.

Should I buy it? Roots is a substantial debut effort from one of the UK’s highest profile young chefs with his own take on field to fork cookery which makes it well worth investigating.

Cuisine: Modern British
Suitable for: Professional chefs/Confident home cooks
Cookbook Review Rating: 4 stars

Buy this book
Roots
£25, Orion Books

Peanut Butter Pudding, Peanut Caramel, Dark Chocolate Sorbet by Chantelle Nicholson

08.30.17_KB_Planted_D1_PBPudd_029.jpg

This is one of those desserts that ticks all the boxes for a luscious treat
– peanut butter, caramel and chocolate. You can make the puddings as well as the sorbet in advance and freeze until needed. The sorbet is also delicious on its own – it makes a little more than you need for 4 people.

Serves 4

For the peanut butter pudding
80g aquafaba
80g caster sugar
65g ground almonds
65g plain flour
½ teaspoon baking powder
pinch of salt
20g peanut butter
20g olive oil
20g non-dairy butter, melted
20ml non-dairy milk

For the dark chocolate sorbet
125g caster sugar
90g cocoa powder
90g dark chocolate, minimum 70% cocoa
solids, broken into pieces
100g ice

For the peanut butter caramel
60g caster sugar
30g non-dairy butter
60ml non-dairy milk
1 tablespoon peanut butter
¼ teaspoon table salt

Preheat the oven to 180°C/fan 160°C/gas mark 4. Grease 4 ramekins,approximately 250ml in volume. Start by making the sorbet. Put the sugar and cocoa powder in a saucepan with 200ml of water. Whisk well, then place over a medium heat and bring to the boil. Continue whisking and cooking the mixture until it thickens,
about 5 minutes. Put the chocolate in a mixing bowl and pour the cocoa mix
through a fine sieve onto the chocolate. Allow to sit for 5 minutes, then whisk
together. Add the ice and whisk until the ice has melted and the mixture has cooled. Churn in an ice-cream maker following the manufacturer’s instructions, or transfer to the freezer and remove and whisk every hour to break up the ice crystals.

For the puddings, whisk the aquafaba in a stand mixer until stiff peaks form.
Gradually add the sugar and whisk until glossy and all sugar grains have dissolved.

In a separate bowl, combine the ground almonds, flour, baking powder and salt. In a third bowl, mix the peanut butter, olive oil, melted butter and milk together. Stir the peanut butter mix into the dry ingredients, then gently fold in the meringue. Divide between the ramekins and bake for 10 minutes.

When ready to serve, make the caramel. Put the sugar into a small, heavybased
saucepan or frying pan. Set over medium heat and leave the sugar to melt, swirling the pan occasionally for even caramelisation. Once the sugar has dissolved and reached a deep golden colour, add the butter and whisk to combine well. Bring the milk to the boil, then add to the caramel and whisk well. Lastly, whisk in the peanut butter and salt.

Drizzle the warm caramel sauce over the peanut puddings and serve with a big scoop of dark chocolate sorbet.

Cook more from this book
Seeded granola with chai spiced poached plums
Whole barbecued spiced cauliflower

Read the review

Buy this book 
Planted: A chef’s show-stopping vegan recipes
£25, Kyle Books

Recipes taken from Planted by Chantelle Nicholson. Published by Kyle Books. Photography by Nassima Rothacker

Seeded Granola and Chai-spiced Poached Plums by Chantelle Nicholson

08.30.17_KB_Planted_D3_Granola_007

Homemade granola is super simple and has a good shelf life when kept in an airtight container. Dark red plums are among my favourite fruits to poach, so I suggest doing a four times recipe and keeping a large container in the fridge – perfect for breakfast and pudding.

Serves 4

For the plums:
8 plums
50g caster sugar
2 English Breakfast tea bags
1 cinnamon stick
4 cardamom pods
2 star anise
4 cloves
1 bay leaf

For the granola:
150g rolled oats
60g coconut oil
40g sesame seeds
40g sunflower seeds
60g pumpkin seeds
60g dates, chopped
½ teaspoon fennel seeds
½ teaspoon salt
2 tablespoons agave syrup
non-dairy yogurt, to serve

Preheat the oven to 170°C/fan 150°C/gas mark 3.

First prepare the plums. Cut each plum in half, remove the stone and set aside. Put the sugar in a large saucepan or deep frying pan with 250ml warm water. Bring to the boil, then add the tea bags, cinnamon stick, cardamom pods, star anise, cloves and bay leaf. Simmer for 3 minutes, then remove from the heat and allow to steep for 6 minutes. Lift out the tea bags and return the pan to the heat. Bring to a simmer, then add the plums, cut-side down. Cover with a lid and simmer gently for 5–7 minutes, until just soft. Remove from the heat, allow to cool slightly, then peel off the skins and transfer to a container and refrigerate.

For the granola, put all the ingredients except the agave into a deep roasting tray and cook for 8–12 minutes, stirring every couple of minutes, until golden. Drizzle over the agave and toast for a further 4 minutes. Remove from the oven and allow to cool.

Serve the granola with the plums and a spoonful of yogurt.

Cook more from this book 
Whole barbecued spiced cauliflower
Peanut butter pudding

Read the review 

Buy the book 
Planted: A chef’s show-stopping vegan recipes
£25, Kyle Books

Recipes taken from Planted by Chantelle Nicholson. Published by Kyle Books. Photography by Nassima Rothacker