Palestine on a Plate by Joudie Kalla

Palastine on a plate

What’s the USP? Authentic Palestinian home cooking using ingredients and methods handed down from the author’s mother and grandmother.

Who’s the author?  Joudie Kalla is a London-based supper club cook and former owner of Baity Kitchen restaurant in Chelsea.

Is it good bedtime reading? A fairly meaty introduction covers some biographical ground as well as some of the basics of middle Eastern flavours and specifically the food and ingredients of Palestine.

Will I have trouble finding the ingredients? Thanks to Ottolenghi, Middle Eastern cooking is now almost as familiar to British home cooks as Indian, Chinese and Thai so you should have few problems finding all you need between the supermarket and your local deli. if you don’t live in an area with a Middle Eastern store nearby, you may have to head online for the likes of sujuk (a spicy Middle Eastern sausage) and Kalla’s favoured Palestinian olive oil (there’s a very handy list of stockists, many of them online,  at the back of the book).

What’s the faff factor? The subtitle of the book is ‘Memories from my mother’s kitchen, so the recipes are very much from the domestic realm rather than being adapted from restaurant dishes. Think simple and straightforward rather than complex and fiddly.

Killer recipes: Middle Eastern courgettes stuffed with lamb; Palestinian pearl cous cous tabbouleh; freekeh salad with marinated chicken and pomegranate salad;  Palestinian sesame handbag bread; fried red mullet with preserved lemon and lentil salad.

What will I love? This is a vibrant, colourful and often healthy style of cooking that’s very approachable and will add variety and flavour to your weekly menu.

Should I buy it? Kalla has entered a crowded market that’s been pretty much cornered by the aforementioned Ottolenghi and his collaborators (the newly published Falastin by his co-author’s Sami Tamimi and Tara Wigley which is also about Palestine is already a number one best selling book – the books of Greg and Lucy Malouf are also excellent). Nevertheless, there are enough delicious recipes in Palestine on a Plate to make it a worthwhile purchase.

Cuisine: Palestinian
Suitable for: Beginners and confident home cooks
Cookbook Review Rating: Three stars

Buy this book
Palestine on a Plate: Memories from my mother’s kitchen

Sweetcorn Curry Croquettes by Tim Anderson

09.30.19TimVegan_CroquettesPrep_007(Kare¯ Korokke)

Makes 16 croquettes, which is a lot
(enough for 4 servings as a main, 8 as a side), but they freeze well

In Japan, they have something called curry pan, or curry bread, which is essentially an oblong doughnut filled with Japanese curry, so you can have curry in a convenient hand-held format. That recipe is nice, but it’s a bit tricky for a book calledVegan JapanEasy (maybe my next book will be called Vegan Japanslightlymoredifficult), so here’s an alternative: curry croquettes, which are perhaps even better because they’re more crunchy on the outside. Win-win!

1 kg (2 lb 4 oz) floury potatoes, peeled and cut into 2.5 cm (1 in) chunks
2 tablespoons oil
1 onion, finely diced
1 hot red chilli, finely diced
150 g (5 oz) sweetcorn (from a tin is fine)
2 heaped tablespoons curry powder
1 heaped tablespoon garam masala
salt, to taste
vegan egg replacer, equivalent to 8 eggs, prepared according to the manufacturers’ instructions, or 2 x recipe quantity of Batter for Breadcrumbing (page 46)
about 80 g (3 oz/scant ⅔ cup) plain (all-purpose) flour, for dredging
about 150 g (5 oz/3½ cups) panko breadcrumbs
about 2 litres (70 fl oz/8 cups) oil, for deep-frying (or less for shallow-frying)

Boil the potatoes until fork-tender, 10–15 minutes, then drain and leave to cool slightly. Meanwhile, saute the onions and chilli in the oil over a medium-high heat until they soften, then add the corn and continue to cook for several minutes until everything starts to brown a bit. Add the spices and cook for another few minutes to make a thick paste, then remove from the heat. Mash the potatoes and stir in the onion-cornspice mixture, and add a generous amount of salt.

When the mash is cool enough to handle, divide itinto 16 equal balls and then squash each ball into a kind of oblong patty shape. Lay the potato patties out on baking sheets lined with foil and transfer to the freezer to firm up for about 30 minutes.

Meanwhile, prepare the egg replacer or batter. Dredge the patties in the flour, then dip in the eggreplacer or batter, and then the panko, ensuring they are all well-coated. At this point the croquettes can be frozen on the baking sheets, or cooked straight away. (The cooking process is the same from frozen or chilled.)

Preheat your oven to 100C (210F/Gas .). Heat the oil in a wide, deep saucepan to 180C (350F). Carefully lower the croquettes into the hot oil, in batches of 4–6, and fry until deep golden brown, about 8 minutes. Remove with a slotted spoon, drain on a wire rack and keep hot in the oven with the oven door slightly open, until ready to serve.

ALTERNATIVE METHOD
Preheat the oven to 200C (400F/Gas 7). Pour enough oil into a non-stick, flat-bottomed frying pan (skillet) to come up to a depth of 5 mm (. in) and place over a medium-high heat. Carefully lower in the croquettes and fry on each side for about 5 minutes, until golden brown. Transfer the par-fried croquettes to a baking sheet and bake in the oven for 15–20 minutes, until a thin knife inserted into the middle of a croquette comes out feeling hot to the touch.

Read the review

Buy this book
Vegan JapanEasy: Classic & modern vegan Japanese recipes to cook at home

Cook from this book
Japanese Mushroom Parcels with Garlic and Soy Sauce
French Onion Ramen

Japanese mushroom parcels with garlic and soy sauce by Tim Anderson

05.13.19_VeganJapaneasy_D4_MushParcels_024

SERVES 2 AS A SIDE OR 1 AS A MAIN

I always associate this preparation, or simple variations thereof, with izakaya – the wonderful Japanese drinkeries-cum-eateries where the food is highly varied but always conducive to drinking loads of good sake or beer – typically salty, snacky, shareable, crowd-pleasing dishes with bold but not over-the-top flavours. This is exactly that kind of dish, mushrooms simply steamed in a foil parcel with plenty of garlic and soy sauce – tearing open the foil is like opening a present on a particularly garlicky Christmas morning. It’s lovely on its own but I would strongly recommend enjoying this with sake – nothing too fancy, as the earthier flavours of cheaper sake are perfect for this mushroomy garlic umami funkbomb.

200 g (7 oz) Japanese mushrooms (such as enoki, shimeji (beech), shiitake and eringi (king oyster)– often supermarkets sell an ‘exotic’ mushroom pack containing a few of each of these, which are perfect)
2 tablespoons soy sauce
1½ teaspoons sake
1½ teaspoons olive oil
3–4 garlic cloves, crushed and thinly sliced
a few grinds of black pepper
a few sprigs of flat-leaf parsley, finely chopped
You will also need some sturdy kitchen foil

Preheat the oven to 220ºC (430°F/Gas 9). Prepare the mushrooms: for enoki or shimeji, cut off their bottoms and break up any large clusters; for shiitake, simply remove the stems; for eringi, cut them into roughly bite-size pieces.

Stir together the soy sauce, sake, olive oil, sliced garlic, black pepper and parsley. Toss the prepared mushrooms with the soy sauce mixture.

Set a wide piece of kitchen foil (about 40 cm/ 16 in long) into a shallow bowl or dish, and place the mushrooms and the sauce into the middle of the foil. Gather up the sides of the foil to cover the mushrooms, crimping them together to form a tight seal. Place the parcel on a baking sheet and bake for 20 minutes.

Transfer the parcel to a plate, taking care not to tear the foil. Serve with the parcel closed and open it at the table.

Buy this book
Vegan JapanEasy: Classic & modern vegan Japanese recipes to cook at home

Cook from this book
French Onion Ramen
Sweetcorn Curry Croquettes

French Onion Ramen by Tim Anderson

05.13.19_VeganJapaneasy_D4_FrenchRamen_022 3

FRENCH ONION RAMEN
SERVES 4

I can never figure out why French onion soup ever went out of style. It’s just so good. I had some that my great aunt Jean made a few years back at a family get-together in Wisconsin and it made me think, ‘I should eat French onion soup every day!’
Suddenly fixated on French onion soup, my thoughts quickly turned to ramen. The molten onions mingle beautifully with the noodles so you get a lovely sweetness and silky texture in every bite, all bathed in a rich, beefy broth that just happens to contain no beef. The onions do take a while to caramelise properly, but for comfort food I think it’s worth the wait.

4 tablespoons olive oil
2 red onions, halved and thinly sliced
2 brown onions, halved and thinly sliced
pinch of salt, or more, to taste
1 teaspoon caster (superfine) or granulated (raw) sugar
2 garlic cloves, crushed and thinly sliced
4 tablespoons sake
2 tablespoons ruby port or red wine
1.2 litres (40 fl oz/4¾ cups) Mushroom or Triple Seaweed Dashi
2 bay leaves
4 sprigs of fresh thyme (optional)
a few grinds of black pepper, or more, to taste
4 tablespoons soy sauce, or more, to taste
1 tablespoon balsamic vinegar
1 tablespoon mirin, or more, to taste
1 tablespoon Marmite (yeast extract)
1½ teaspoons cornflour (cornstarch)
200 g (7 oz) fresh spinach, washed
¼ Savoy cabbage, cut into thin strips
4 portions of uncooked ramen noodles
4 spring onions (scallions), thinly sliced
80 g (3 oz) bamboo shoots (if you can, use Japanese menma – pickled bamboo shoots)
a few drops of sesame oil and/or truffle oil
60–80 g (2–3 oz) vegan cheese (‘Cheddar’ or ‘Italian-style’), grated (shredded)
4 slices of good-quality bread, toasted

Heat the oil in a deep saucepan or casserole (Dutch oven) and add the onions and the salt. Cook over a medium-high heat for 10 minutes or so, stirring frequently, until they soften, then reduce the heat to medium-low and cook for another 45–50 minutes, stirring every 10 minutes. After about 15 minutes, the onions will start to caramelise, so make sure you scrape the bottom of the pan when you stir to prevent them from catching and burning prematurely. When the onions are just starting to brown, stir in the sugar and add the garlic. During the last 10 minutes of cooking, you will have to stir and scrape often to ensure the onions don’t burn. (If it’s proving difficult to scrape up the stuck bits, add a splash of water, which should help them release nicely.)

Add the sake and the port or wine. Add the dashi, bay leaves, thyme and black pepper and bring to a simmer. Simmer for 30 minutes, then stir in the soy sauce, balsamic vinegar, mirin and Marmite. Taste and adjust the seasoning as you like it – it should be fairly salty and slightly sweet. Remove the bay leaves and thyme stems and discard. Spoon about 3 tablespoons of the broth into a small dish and leave to cool. Stir the cornflour into the cooled broth to make a thin slurry, then stir it back into the soup and bring to the boil to thicken the broth slightly.

Bring a large saucepan full of water to the boil and blanch the spinach for 15 seconds. Remove with a slotted spoon and rinse under cold water. Drain well, pressing out any excess water. In the same pan, boil the cabbage for 3–4 minutes until just tender, then remove with a slotted spoon and set aside. Let the water return to a rolling boil, then cook the ramen until al dente, according to the packet instructions. Drain well.

Divide the ramen among 4 deep bowls and ladle over the soup. Gently stir the noodles through the soup to ensure they aren’t sticking together. Top each ramen with the spinach, cabbage, spring onions, bamboo shoots, sesame or truffle oil and vegan cheese. Serve with the toast on the side to soak up the broth once the noodles have all been slurped away.

Buy this book
Vegan JapanEasy: Classic & modern vegan Japanese recipes to cook at home

Cook from this book
Japanese Mushroom Parcels with Garlic and Soy Sauce
Sweetcorn Curry Croquettes

Vegan JapanEasy by Tim Anderson


Vegan Japaneasy

What’s the USP? Full Ronseal vibes here – Vegan JapanEasy is a cookbook filled with easy vegan Japanese recipes. I’m really not sure you need me to tell you that, actually.

Eesh. Sorry I asked. Alright then, who’s the author? Tim Anderson was the youngest winner of Masterchef when he and his Japanese-influenced dishes came out top back in 2011. Since then he’s opened his own restaurant – Nanban – and three vibrant Japanese cookbooks, including 2017’s JapanEasy. This, its vegan spinoff, is his fourth.

Is it good bedtime reading? There’s definitely plenty to read in here. Of note are the usual pages detailing Japanese ingredients you’ll want to familiarise yourself with, punched up with useful ideas on each ingredient’s uses outside of Japanese cuisine.

Anderson writes lovingly and respectfully about Japanese culture and cuisine, and his occasional treatises on dashi or Japanese curry roux are always entertaining – as are his recipe introductions, which are occasionally longer than the recipes themselves.

Will I have trouble finding the ingredients? Anderson’s whole thing is ease, and sourcing the ingredients is no different. Most ingredients are widely available but at worst will warrant a trip to an Asian supermarket. The recipes generally avoid any mock-meat and non-dairy cheeses as well, opting instead for light, delicious looking vegetable numbers.

What’s the faff factor? Do you really need to ask? Nothing in Vegan JapanEasy should throw the average home cook. That said, some dishes do require a little time or, in the case of the ramen recipes, a glut of ingredients – so not every dish is going to cut it for a weeknight dinner.

Killer recipes Teriyaki-roasted carrots; jackfruit karaage; kimchi miso hotpot; cauliflower katsu curry;  Japanese style celeriac steak; fridge drawer fried rice.

What will I love? Anderson’s non-pretentious approach to cooking means that not only does everything look delicious, it’s also tantalisingly do-able. Dishes like Pesto Udon are so simple, and yet so tempting, that there’s a good chance you won’t eat anything else ever again.

What won’t I love? The only slightly grating factor is Anderson’s fondness for ranking the ease of each dish at the bottom of the recipe. Given that ease is the premise of the entire book, it’s entirely unnecessary and instead ends up as a destination for some fairly poor dad jokes that wear thin pretty quickly: “the only cult I’d join is the Not Diffi Cult, and this recipe would be our Kool-Aid”

Should I buy it? In short, yes. Anderson’s book is as practical and imaginative as any other Japanese cookbook on the market. In fact, even as a meat-eater, Vegan JapanEasy has a more appealing range of recipes than the original carnivore-friendly JapanEasy title.

Cuisine: Japanese
Suitable for: Beginners and confident home cooks
Cookbook Review Rating: Four stars

Review written by Stephen Rötzsch Thomas a Brighton-based writer. Follow him on Twitter and Instagram at @srotzschthomas.

Buy this book
Vegan JapanEasy: Classic & modern vegan Japanese recipes to cook at home

Cook from this book
Japanese Mushroom Parcels with Garlic and Soy Sauce
Sweetcorn Curry Croquettes
French Onion Ramen

Take One Tin by Lola Milne

Take one tin

What’s the USP? Practical storecupboard meals, with recipes that stray a little from the drab usual suspects.

Who’s the author? Lola Milne isn’t necessarily the most obvious author for a cookbook – her work in the food industry has mostly been behind the camera, as an in-demand photographer and food stylist. This does pay dividends in the book though, with vibrant and beautifully shot dishes livening up what could have easily been a fairly unexciting premise.

What’s great about it? Milne’s focus on long-life products and storecupboard staples feels decidedly modern, and will appeal to people of all ages – perfect for knocking together something for the family when you’ve not had a chance to get to the shops. By focusing on tinned foods as a starting point, Milne has found it easy to put together a collection of recipes that are entirely without meat. Vegetarians will delight, and a wealth of pescatarian dishes ensures plenty of variety throughout the book.

You can’t help but feel that the timing of Take One Tin’s publication will prove a little fortuitous for Milne, too. As much of the world contemplates societal lockdowns and potentially long isolation in the wake of Covid-19, this cookbook will prove an increasingly useful addition to many homes.

Is it good bedtime reading? Not at all. A two-page introduction and two short sentences at the beginning of each recipe. Three, if you’re lucky.

Will I have trouble finding the ingredients? The very nature of Take One Tin ensures that there are no real surprises on the ingredient lists. Whether or not you have trouble securing what you need will come down solely to how well your local supermarket is dealing with any panic buying that might be going on.

What’s the faff factor? What faff factor? Milne’s recipes are all remarkably simple affairs. A bit of pan-frying, maybe. Mix a few items together and chuck them in the oven for a bit. Whilst Milne’s food-styling skills ensure dishes look very impressive, the actual work necessary to pull them off won’t faze the average home cook in the slightest.

How often will I cook from the book? In normal day-to-day life? Maybe once every couple of weeks. These are easy and practical recipes that many people will happily call on when they don’t want to work too hard for their dinner. In a global pandemic? Take One Tin might just prove invaluable.

Killer recipes? Jackfruit & kidney bean chilli, crab thoran, Sri Lankan mackerel curry, banoffee pie with hazelnut cream.

Should I buy it? There are a few storecupboard-centric cookbooks out there, and whilst others might cover more ground (Claire Thomson’s excellent The Art of the Larder being one), Take One Tin is a great deal more accessible, and balances the genre’s practical aspects with genuinely exciting and contemporary ideas.

Cuisine: International
Suitable for: Beginners and confident home cooks
Cookbook Review Rating: Four stars

Buy this book 
Take One Tin: 80 delicious meals from the storecupboard

Review written by Stephen Rötzsch Thomas who is a Brighton-based writer, and is exactly the sort of person who posts his dinner on Instagram. Follow him on Twitter and Instagram at @srotzschthomas.

Marcus Everyday by Marcus Wareing

Marcus Everyday


What’s the USP? Approachable, achievable family recipes from a Michelin starred TV chef.

Who are the authors? Marcus Wareing has made his name as one of London’s best-known fine-dining chefs with three restaurants: Marcus, The Gilbert Scott and Tredwells and as a stern taskmaster on Masterchef: The Professionals. He rose to fame in the 90’s as Gordon Ramsay’s right-hand man, heading up a number of restaurants including the original Petrus in St James’s Street. His falling out with Ramsay is well documented.

Wareing’s co-author for the sixth time is Chantelle Nicholson (their previous books include The Gilbert Scott Book of British Food; New Classics and Marcus at Home among others). A New Zealand-born lawyer turned chef whose CV includes The Savoy Grill and Petrus, she opened The Gilbert Scott as general manager and is currently back in the kitchen as head chef of Tredwells in Coven Garden and is the author of Planted her debut solo cookbook outing.

Is it good bedtime reading? Only if you fall asleep really, really quickly. A three-page introduction plus brief chapter and recipe introductions and that’s your lot.

Will I have trouble finding ingredients? Apart from lavender flowers, whole smoked ham hock, fresh bergamot and ripe pears (who has ever found a ripe pear?) you should have no problem tracking down 99 per cent of the ingredients in this book. Even things like fresh turmeric, Gordal olives and white miso should be available in your local Waitrose.

What’s the faff factor?  The book’s raison d’etre is to fling out the faff, so you can mostly expect short ingredient lists and straightforward methods. That’s not always the case however and the prep and cooking times that are provided for all the recipes range from 5 minutes prep and under 10 minutes cooking time for a caramelised banana split up to 1 3/4 hours prep and 3 3/4 hours cooking time for confit of duck ravioli with cucumber and a peanut, sesame and chilli dressing. But at least you know what you’re letting yourself in for.

How often will I cook from the book? No one actually cooks from one book every day, do they? It’s a bit of a self-defeating title really. If people did buy the book and cook from it every day then that’s HarperCollinsPublishers out of business pretty sharpish, or at least Marcus Wareing’s career as a cookbook writer cut mercilessly short. But there is certainly a wide enough range and variety of recipes to keep us cuisine-hopping Brits satisfied for quite some time with everything from celeriac, ham hock and barley hot pot to Thai chicken salad  and prawn tomato and chilli linguine in between. There’s also guidance on fermenting, pickling, jam and chutney making for when you’re in the mood for a bit of a project, so there’s little chance of this turning into Marcus Collecting Dust Everyday.

Killer recipes? Recipes that may well become regular standbys include hassleback potatoes with red wine and pork ragu; haddock with lentils, basil and mascarpone; beef and garden herb meatballs with roasted tomato sauce; barbecued lamb ribs with chimichurri sauce and chocolate and peanut caramel tray bake. 

What will I love? This is a kinder, gentler Marcus; the family man at home in his East Sussex hideaway Melfort House, gardening and cooking with his kids and grinning for the camera in his casual blue denim shirt. It’s the sort of aspiration lifestyle stuff you’d associate with the likes of Bill Granger or Donna Hay, but Wareing pulls it off. The recipes are very much ‘home cookery’ as Wareing likes to call it with not a hint of Michelin-starred hubris.

Should I buy it? There are many books already on the market aimed at this style of cooking (not least the excellent Bill Granger Every Day) but Marcus Everyday ticks enough modern trend and trope boxes including vegan, vegetarian, healthy eating, low waste cooking, preserving and barbecuing to make it a useful addition to any collection. It will be of particular interest to newbie cooks or those in need of updating and broadening their style and repertoire.

Cuisine: International  
Suitable for: 
For beginners/confident home cooks
Cookbook Review Rating: 
Four stars

Buy this book
Marcus Everyday: Easy Family Food for Every Kind of Day
Harper Collins Publishers, £20


The Incredible Lemon Pie from Big Momma Cucina Popolare

279 Tarte Citron.jpg

Lemon meringue tart (pie)

Per 6 amici

Preparation time: 25 minutes
Chilling time: overnight
Cooking time: 30 minutes

Ingredienti
For the pastry (pie dough)
90 g/3 and 1/4 oz (6 tablespoons) unsalted butter
20 g/ 3/4 oz (scant 3 and 1/2 tablespoons) ground almonds (almond meal)
50 g/1 and 3/4 oz (generous 1/3 cup) icing (confectioners’) sugar
2 large (US extra large) eggs
150 g/5 oz (1 and 1/4 cups) plain (all-purpose) flour
1/2 teaspoon salt
For the lemon custard
1 leaf (sheet) gelatine
3 unwaxed lemons
3 eggs
70 g/2 and 1/2 oz (1/3 cup) caster (superfine) sugar
140 g/5 oz (1 and 1/4 sticks) unsalted butter
For the Italian meringue
230 g/8 oz (scant 1 and 1/4 cups) caster (superfine) sugar
2 tablespoons water
juice of 1 lemon
4 egg whites

Come fare

Make the pastry. In a bowl, soften the butter with a spatula. In a mixer with a paddle (flat beater) attachment, beat the softened butter, ground almonds (almond meal) and icing (confectioners’) sugar until smooth. Then add the eggs, one at a time, while beating. Incorporate the flour and salt. Mix the pastry dough until crumbly. Form the dough into a ball, wrap in clingfilm (plastic wrap) and rest overnight in the refrigerator.

Make the lemon custard. Soften the gelatine in a bowl of cold water for 5 minutes. Zest two of the lemons and squeeze all three. In a bowl, beat the eggs with a fork. Combine the lemon juice, sugar and butter in a pan and bring to the boil. Gradually add the eggs, incorporating with a whisk. Cook over a low heat until the mixture comes to a gentle boil.

Pour the mixture into a bowl. Squeeze the gelatine and incorporate. Add the lemon zest. Use an immersion blender to mix well. Put into an airtight container and rest overnight in the refrigerator.

Preheat the oven to 175°C/350°F/Gas Mark 4). Roll out the pastry dough into a 6-mm/1/4-inch-thick disc. Grease a tart pan with butter and line with the pastry. Bake in the preheated oven for 15 minutes.

Make the Italian meringue. Dissolve the sugar into 2 tablespoons of water and the lemon juice in a pan over a low heat. Bring to the boil and cook until the mixture reads 120°C/250°F on a cooking thermometer. If you don’t have a cooking thermometer, put a little of the syrup in a spoon and let one drop fall into a glass of cold water. If it forms a small, soft ball, the syrup is ready. In a grease-free bowl, whisk the egg whites to stiff peaks. Pour the syrup in a thin stream into the meringue while whisking until the mixture cools.

Fill the pastry case (shell) with the lemon custard. Use a plastic spatula to cover the tart with meringue, creating a dome in the centre. Caramelize with a chef’s blowtorch. Chill in the refrigerator for 1 hour before serving.

Cool to know
‘If it’s not big, it’s not big enough’ is one of our mottos, so now you know why our meringue stands 20 cm/8 inches high…

Cook more from this book 
La Gran Carbonara
Green Pizz’

Read the review 

Buy this book
Big Mamma Cucina Popolare: Contemporary Italian Recipes
Phaidon, £27.95

Green Pizz’ from Big Momma Cucina Popolare

121 Green Pizz.jpg

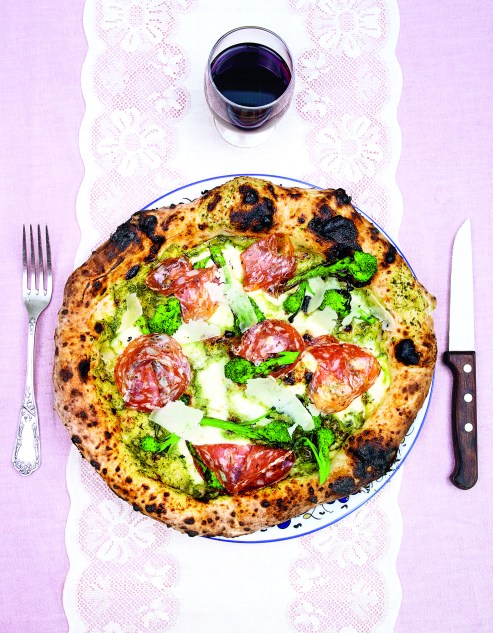
Rapini (broccoli rabe) cream, finocchiona, mozzarella and pecorino pizza

Per 1 pizza

Preparation time: 20 minutes
Resting time: 10 minutes
Cooking time: 30 minutes

Ingredienti

2 bunches rapini (broccoli rabe) or Tenderstem broccoli (broccolini)
2 tablespoons olive oil
2 anchovy fillets in oil, drained
1/2 quantity (250 g/9 oz) Pizza Dough (see below)
5 thin slices of finocchiona or salami
90 g/3 and ¼ oz fior di latte (or mozzarella di bufala), roughly cut
70 g/2 and ½ oz (3/4 cup) grated pecorino, plus a few shavings to garnish
Salt

Come fare

Chop half the rapini (broccoli rabe) stalks (stems) and remove the leaves. Cook the rapini for 2 minutes in a large pan of salted boiling water. Drain, then immerse them in a large container of ice water to stop further cooking. Leave to cool for 10 minutes.

Make the rapini cream. In a large pan, heat 1 tablespoon of the olive oil over a high heat. Chop the remaining rapini stalks and fry with the anchovies for 15 minutes over a medium heat. Process everything in a food processor until you have a smooth cream.

Preheat the oven to 250°C/480°F/Gas Mark 9. Cover a baking sheet with baking (parchment) paper. On a floured work surface, roll out the pizza dough into a circle about 30 cm/12 inches in diameter and about 2 cm/ 3/4 inch thick.

Place the pizza base (crust) on the baking paper. Cover it with the rapini cream and drizzle over the remaining 1 tablespoon of olive oil. Bake for 5 minutes.

Remove from the oven and add the chopped rapini, finocchiona slices and mozzarella. Bake for a further 5 minutes. Remove from the oven and sprinkle with the grated and shaved pecorino. Don’t wait, serve and enjoy immediately!

Cool to know
Finocchiona is a type of traditional Italian salami from Tuscany. Its name comes from ‘finocchio’ – meaning ‘fennel’ in Italian – which, along with pepper, gives this salami its distinctive flavour.

Neapolitan Pizza Dough
A tip from Giuseppe Cutraro

Per 2 pizze

Preparation time: 25 minutes
Rising time: 8 hours

5 g/1/8 oz (13/4 teaspoons) fresh yeast or 1 teaspoon fast-action dried (active dry) yeast
300 g/11 oz (2½ cups) soft (pastry) flour, such as Italian type ’00’
1 generous tablespoon olive oil
2 teaspoons fine salt

Come fare

Dissolve the yeast in 200 ml/7 fl oz (scant 1 cup) of lukewarm water. Sift the flour and add half to the water. Work by hand for 10 minutes, without leaving any lumps, gently mixing the liquid with the flour and kneading the resulting dough well. Incorporate the remaining flour,olive oil and salt.

Continue to knead by hand for 15 minutes until the dough is very smooth and comes off the work surface very easily.

Put into a bowl, cover with a wet cloth and leave to rise for 2 hours in a warm room (about 24°C/75°F).

Dust a rimmed baking sheet. Divide the dough into two and put the dough balls onto the baking sheet. Cover with a cloth or lid without touching the dough and leave to rise in a warm room for 6 hours. The pizza dough can be stored in the refrigerator for 3–4 days.

How to stretch pizza dough

Neapolitan pizza-making is an art form (now recognized as intangible cultural heritage by UNESCO). Giuseppe Cutraro, our chief pizzaiolo, ‘made in Napoli’, explains how to stretch the dough. Professional tips below…

You begin by dusting your work surface (preferably marble to keep the temperature at about 20°C/70°F) with flour.

Put the dough on the work surface and start by stretching it with your hands to form a circle about 30 cm/12 inches in diameter. And here’s where things get a little tough: twirling the pizza with your hands. Unlike what you might think, you don’t toss the dough high into the air, even though it looks like a really cool thing to do. This can even be done on the work surface: make the dough into a circle by rotating it, or by repeatedly lifting it with the left hand while holding it with the right. These actions allow the dough to be stretched uniformly.

Then lay the dough on the work surface and start pushing it from the centre towards the edges with your finger, which pushes the air to the edges and creates a raised lip that is light and puffed when cooked. We pizzaioli call it a cornicione (‘cornice’). It’s the hallmark of genuine Neapolitan pizza – generous edges, about 2 cm/¾ inch, which puff up at 430°C/800°F in the wood-fired pizza oven.

Giuseppe started learning the trade at the age of 15, at the historic Starita a Materdei pizzeria in Naples. We will probably never equal his pizza-making skills, but we can at least pretend.

Cook more from this book 
La Gran Carbonara
The Incredible Lemon Pie

Read the review 

Buy this book
Big Mamma Cucina Popolare: Contemporary Italian Recipes
Phaidon, £27.95

La Gran Carbonara from Big Momma Cucina Popolare

191 La Gran Carbonara.jpg

Spaghetti carbonara

Per 4 amici

Preparation time: 20 minutes
Cooking time: 15 minutes
30 minutes or less, 5 ingredients or less

Ingredienti

3 whole eggs and 6 egg yolks
90 g/3 oz (1 cup) grated pecorino cheese
90 g/3 oz (1 cup) grated Parmesan cheese
1 teaspoon pepper
400 g/14 oz spaghetti
8 slices of guanciale (cured pork cheek/jowl), finely sliced

Come fare

In a bowl, mix the whole eggs and egg yolks with the pecorino, Parmesan and pepper. Set aside.

Bring a large pan of salted water to the boil and cook the spaghetti according to the package directions, then drain, reserving the cooking water.

In the meantime, add the guanciale slices to a dry frying pan (skillet) over a medium heat and sear for 5 minutes, or until crispy. Add 1 tablespoon of the pasta cooking water, followed by the spaghetti.

Remove the pan from the heat. Add the egg mixture and mix briskly. The eggs should not cook too much and the consistency of the sauce should be creamy.

Transfer to a large serving dish and serve immediately.

Cool to know
You heard right: real Italian carbonara sauce is made without cream. Our chef Filippo La Gattuta makes a spectacle of serving it straight out of a big pecorino wheel at our London trattoria Gloria.

Cook more from this book
Green Pizz’
The Incredible Lemon Pie

Read the review 

Buy this book 
Big Mamma Cucina Popolare: Contemporary Italian Recipes
Phaidon, £27.95